OpenSCAD Preview and Language Support
OpenSCAD is a powerful tool for creating 3D models programmatically. This section covers how the URDF editor integrates OpenSCAD support, including file handling, previewing, and language features.
OpenSCAD File Handling
The URDF editor can open and edit .scad files directly. When a .scad file is opened, the editor provides syntax highlighting and basic editing features.
OpenSCAD Preview
The editor includes a preview feature for OpenSCAD files. When a .scad file is saved, the editor automatically converts it to STL format using the openscad-wasm-prebuilt module. The generated STL file is then displayed in the 3D viewer.
Note: STL format does not support colors or textures. OpenSCAD models are rendered as single-color geometry in the preview.
SVG Export for 2D Designs
For 2D OpenSCAD designs, the editor supports exporting to SVG (Scalable Vector Graphics) format. This is particularly useful for creating vector graphics from OpenSCAD's 2D primitives like circles, squares, and polygons.
How to Export to SVG
- From Explorer Context Menu:
- Right-click on any
.scadfile - Select "Export... Export SVG" from the context menu
- The SVG file will be created in the same directory with a
.svgextension -
You'll be prompted to open the exported file
-
From Command Palette:
- Open a
.scadfile in the editor - Press
Ctrl+Shift+P(orCmd+Shift+Pon Mac) - Type "Export SVG" and select "URDF: Export SVG"
SVG Export Features
- 2D Shape Support: Works with 2D OpenSCAD primitives (circle, square, polygon, text, etc.)
- Vector Graphics: Preserves scalability and crispness at any resolution
- Library Support: Includes all configured OpenSCAD libraries during export
- Progress Indication: Shows conversion progress with cancellation support
- Error Handling: Clear error messages if the export fails
Note: SVG export is designed for 2D designs. For 3D designs, use the existing STL export functionality (automatic on save/preview).
Export Parts (Batch Export)
The OpenSCAD context menu includes an Export... submenu with Export STL, Export SVG, and Export Parts.
Export Parts batch-exports each named part by iterating a part list and running OpenSCAD once per part using customizer override -D part=....
Part List Formats Supported
The exporter detects part names from either of these forms:
-
Customizer dropdown style (recommended)
part = "assembly"; // [assembly, t_edge, t_edge_half, t_edge_debug, mid, mid_t, edge, corner] -
Array style
part = ["assembly", "t_edge", "mid", "corner"];
How Export Format Is Chosen Per Part
- If a part name suggests 2D (for example:
2d,svg,laser cut,flat,outline,profile,sheet,panel,plate), it exports as SVG. - Otherwise, it exports as STL.
Output File Naming
Output files are renamed to include the part name:
<source>.<part>.stl<source>.<part>.svg
Example for robot.scad:
robot.assembly.stlrobot.t_edge.svg
If a target filename already exists, it is overwritten with the latest export.
OpenSCAD Language Features
The editor provides several language features for OpenSCAD:
- Syntax Highlighting: Basic syntax highlighting is available for OpenSCAD code.
- Code Snippets: Common OpenSCAD patterns are available as code snippets.
- Error Reporting: The editor reports syntax errors in OpenSCAD code.
- OpenSCAD Library Support: The editor recognizes and provides support for standard OpenSCAD libraries.
OpenSCAD Library Configuration
The extension automatically loads OpenSCAD libraries from:
- SCAD file directory: The directory containing the SCAD file being previewed (highest priority). Only this directory and its subdirectories are loaded from the workspace.
- OS-specific default paths:
- Windows: %USERPROFILE%\Documents\OpenSCAD\libraries
- Linux: $HOME/.local/share/OpenSCAD/libraries
- macOS: $HOME/Documents/OpenSCAD/libraries
Important Performance Notes:
- Files in the same directory as the SCAD file can reference each other without any configuration.
- If your SCAD file is at the workspace root, all workspace files will be copied, which may cause rendering delays. Consider organizing SCAD files in a subdirectory for better performance.
- Certain directories are automatically excluded from copying: .git, node_modules, venv, .venv, env, .env, __pycache__, .pytest_cache, .tox, dist, build, .cache, .vscode, .idea, target, bin, obj
To add additional custom library paths:
1. Open VS Code settings (Ctrl+,)
2. Search for "urdf-editor.OpenSCADLibraryPaths"
3. Add additional library directories (supports ${workspaceFolder} variable)
Example settings.json:
{
  "urdf-editor.OpenSCADLibraryPaths": [
    "${workspaceFolder}/scad_libs",
    "C:\\MyLibraries\\OpenSCAD",
    "/usr/local/share/openscad/libraries"
  ]
}
OpenSCAD Documentation Generation
The extension can automatically generate documentation for your OpenSCAD libraries:
- Open the command palette (
Ctrl+Shift+P) - Run "URDF: Generate OpenSCAD Libraries Documentation"
- Choose where to save the markdown file
- The extension will scan all library paths and extract:
- Header comments from library files
- Module and function signatures
- Parameter documentation
- Usage examples
This documentation is also available to AI assistants via the Model Context Protocol (MCP) for intelligent code completion and suggestions.
AI-Assisted Development Features
The URDF Editor provides advanced AI integration to enhance your OpenSCAD development workflow. These features leverage modern AI capabilities to make 3D modeling more intuitive and efficient.
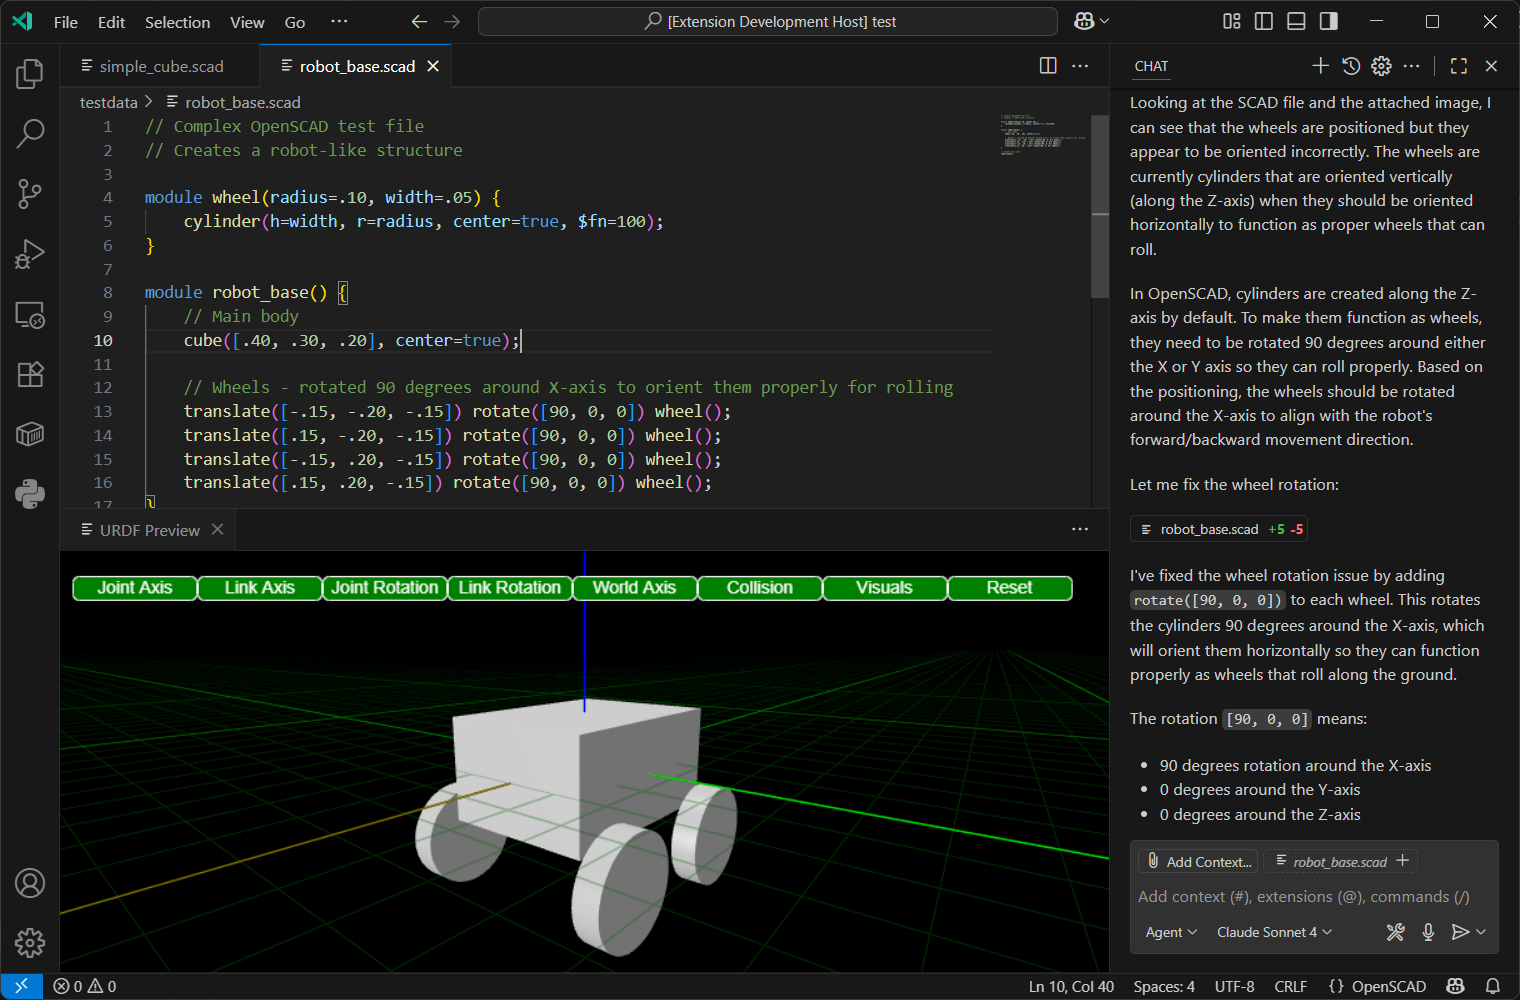
Visual Feedback Loop
- Screenshot Integration: The editor can automatically capture screenshots of your 3D models and provide them to AI assistants for visual analysis
- Real-time Preview: AI can see exactly what your OpenSCAD code produces, enabling contextual suggestions and corrections
- Visual Debugging: When your model doesn't look right, AI can analyze the rendered output and suggest code improvements
Model Context Protocol (MCP) Integration
The editor includes a built-in MCP server that exposes powerful tools for AI assistants:
take_screenshot: Captures high-quality screenshots of active OpenSCAD previews for AI analysistake_screenshot_by_filename: Takes targeted screenshots of specific files, automatically opening previews as neededget_openscad_libraries: Provides comprehensive documentation of available OpenSCAD libraries, modules, and functions
AI-Powered Development Workflow
- Write or describe your 3D model requirements in natural language
- Generate code using AI assistance with full library context
- Preview instantly with optimized fast rendering (preview mode)
- Get visual feedback through automatic screenshot analysis
- Iterate rapidly with AI suggestions based on rendered output
Performance Optimizations for AI Workflow
- Fast Preview Mode: All OpenSCAD files render in optimized preview mode by default (10x faster)
- Automatic Performance Settings: Injected optimization settings (
$fn=8,$fa=12,$fs=2) for quick iteration - Cancellable Operations: Long-running renders can be interrupted instantly
- 1-minute Timeout: Quick feedback prevents workflow interruption
This integrated approach enables a new style of "visual programming" where AI can understand both your code intent and the actual 3D output, creating a powerful feedback loop for rapid prototyping and design iteration.
Exposed AI Skills
The following OpenSCAD skills are available to AI assistants through the Contributes extension interface:
- openscad-customizer: Use this skill when modifying OpenSCAD files where the user wants to use the customizer features (parameter parsing, UI generation, and conversion to STL/SVG/GLB with parameter overrides).
- openscad-development: Use this skill when modifying OpenSCAD files (*.scad)
- openscad-integration: Use when creating URDF or Xacro files which require non-trivial geometry
- openscad-librarian: Discover, recommend, and install OpenSCAD libraries for your projects. Use when: needing geometry functions, seeking existing modules before creating, managing library dependencies, or exploring what libraries are available in your workspace.
OpenSCAD Customizer
The URDF Editor includes an OpenSCAD Customizer panel that lets you interactively adjust parameters in your .scad files without editing code directly.
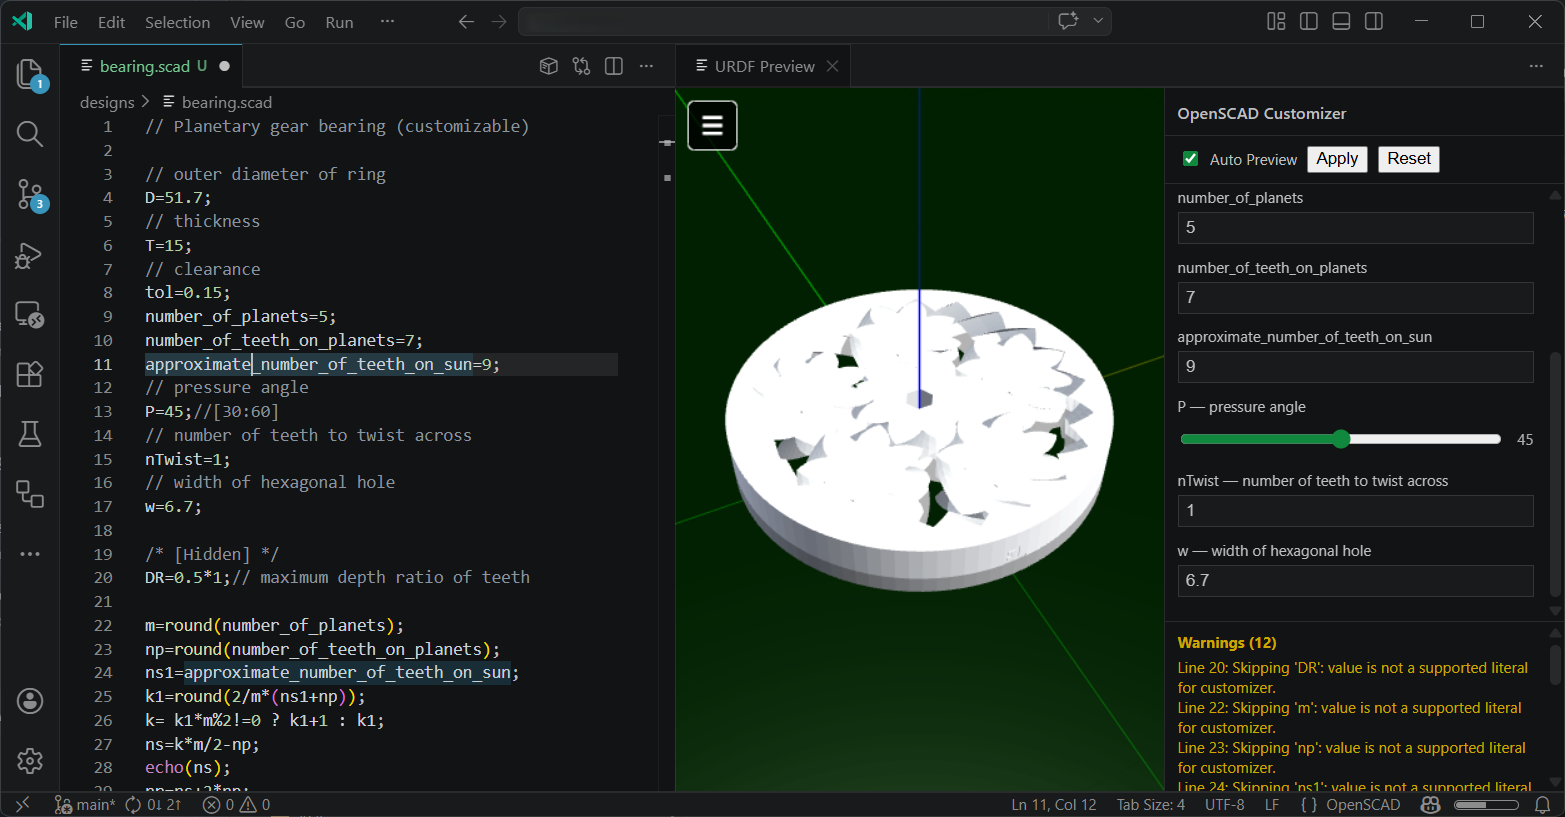
Enabling the Customizer
The Customizer panel appears automatically in the preview sidebar when a .scad file is open. Use the Auto Preview checkbox to toggle automatic re-rendering whenever a value changes, or use the Apply button to trigger rendering manually. Reset restores all values to their defaults from the source file.
Defining Customizable Parameters
Parameters are parsed from top-level variable assignments in your .scad file. Follow the standard OpenSCAD Customizer conventions:
Labels — place a single-line comment immediately before the assignment to add a description:
// pressure angle
P = 45;
Groups — use a block comment of the form /* [Group Name] */ to organize parameters into named sections:
/* [Slider] */
// slider widget for number
slider = 34; // [10:100]
Sliders — append an inline range comment // [min:max] to create a slider. Use // [min:step:max] for a stepped slider:
slider = 34;     // [10:100]
stepSlider = 2;  // [0:5:100]
Dropdowns — provide a comma-separated list of values to create a combo box. Works for both numbers and strings:
Numbers = 2;      // [0, 1, 2, 3]
Strings = "foo";  // [foo, bar, baz]
Checkboxes — boolean variables automatically render as a checkbox:
Variable = true;
Textboxes — string variables become a text input. Append // [N] to constrain the input length:
String = "length"; // [8]
Vectors — vector variables are supported and can include a range to constrain each component:
Vector3 = [12, 34, 46]; // [0:2:50]
Hiding parameters — variables declared inside a /* [Hidden] */ section are excluded from the Customizer panel:
/* [Hidden] */
debugMode = true;
Warnings
The Customizer panel displays a Warnings section listing any variables that were skipped. Common reasons include:
- The value is a computed expression (e.g. m = round(number_of_planets))
- The literal type is not supported by the Customizer parser
Warnings do not affect rendering — skipped variables retain their values from the source file.
Disabling the Customizer
To disable the Customizer panel globally, you can adjust the workspace or user setting:
- Open VS Code settings (
Ctrl+,) - Search for "OpenSCAD Customizer Enabled"
- Uncheck the box or set
"urdf-editor.OpenSCADCustomizerEnabled": false
When disabled, the Customizer panel will not appear even if customizer variables are detected in the .scad file.
Acknowledgements
Special thanks to the OpenSCAD community for their work.
Resources
- OpenSCAD: https://www.openscad.org/
- OpenSCAD Libraries: https://en.wikibooks.org/wiki/OpenSCAD_User_Manual/Libraries
- OpenSCAD Customizer: https://en.wikibooks.org/wiki/OpenSCAD_User_Manual/Customizer
- Ranch Hand Robotics - Additional OpenSCAD Skills: https://github.com/Ranch-Hand-Robotics/openscad_skills